spend R1000 & 2kg or less = free shipping.
Menu

spend R1000 & 2kg or less = free shipping.

Your Cart is Empty
9 min read
This post is actually part of a two part series on novel technique for developing bonsai, although specifically with Chinese or Trident maples in mind but you can use the technique I will describe below for many other deciduous species. You can read the first part here. Once again the reason for the timing of this post is as the best time of the year to apply the technique is in spring when you would normally be repotting.
This second technique is essentially about fusing several trunks together to rapidly create a more robust or substantial trunk without the need to field grow for many years.
Once again we start out with very ordinary material, the only requirement really is that the trees be healthy - which pretty much is a requirement for any technique. In the case study below I used Trident maples which I had grown from seed and which were probably around 4 years old or so, but I cannot remember. You can do this same technique very easily with figs too, and pretty much any tree which has a tendency to heal easily. Plants such as olives, hackberry and azaleas might prove to be challenging to impossible though, at least in the average South African climate.
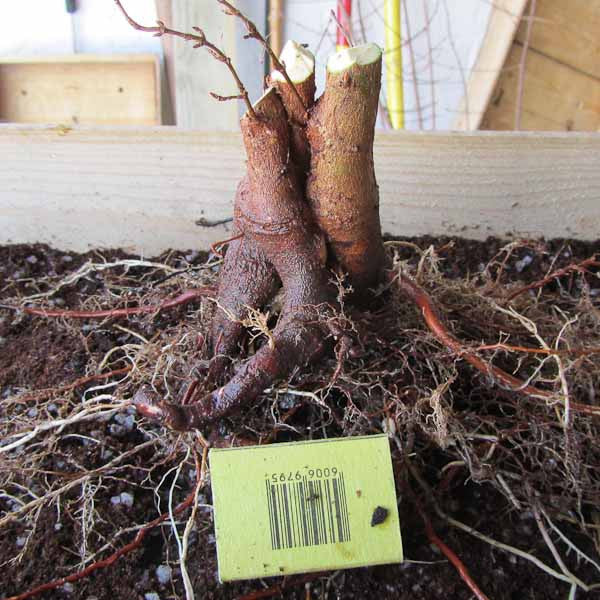
Image caption. 6th August 2010
You can do this with any number of trunks but I would suggest that it be more than 2. You will have no problem fusing only two trunks but it will be a very flat or oblong trunk. A odd number seems like a practical number as it will prevent very geometric shapes from being formed. I have used 3, but you could use 5, 7, 9 and so on.
From the preceding image you can see that the trunks of the scions have been cut quite short. However please take note that I cut back to visible buds or existing branchlets. In my experience if you cut the trunk too short you might not get any new buds forming and the plant will die. So it is safer to prepare the tree a year before the time and have it bud lower down than where you intend cutting the trunk to if you do not have existing growth there.
You will be pressing each tree up to the other and so you may need to eliminate some roots which might hinder this.
Just before binding the trunks together you will want to remove the layer of bark exposing the green cambium below however until you have everything ready you will want to wait on this step.
It is my suggestion that for the first year, while you're fusing the trunks, to use a container; either ceramic or wood. The reason for this is as you can observe the progress easier and you can better control watering and fertilizing. Any container will do really but I used a wooden box as I prefer the thermal properties of wood to something like plastic. However you can also use an over-sized ceramic bonsai pot which is not being used at the time or you can select from one of many different sizes of plastic growing trays. What's great about the latter is that they have a large number of drainage holes. This promotes oxygenation of the growing medium, assuming you are using something like the Professional mix, a mix of Pumice and Akadama or any other fast draining mix which includes a large percentage of LECA.
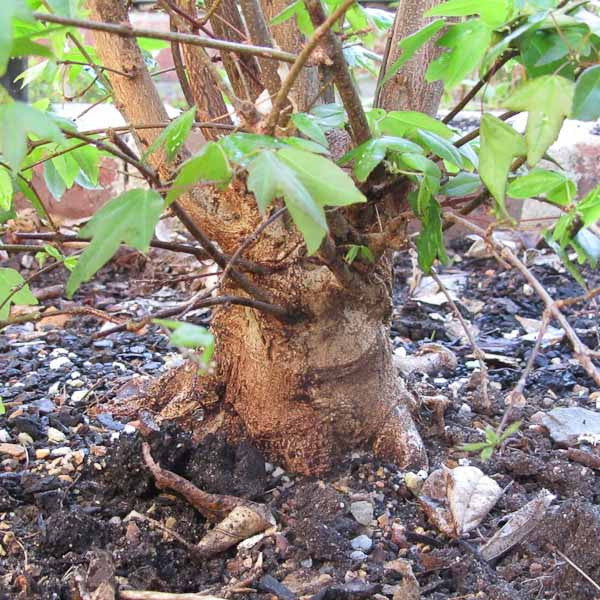
Image caption. October 2013
Once the trunks have fused you can plant them out into the ground as this will result in even faster development. You will also need to feed and water well. With regards to watering, if you are using a free draining mix you will need to make sure you water enough to prevent drying of the roots. The upside of such an open mix is that you really cannot over-water, so root rot is of no concern.
Other than the obvious plant material, container and growing media already discussed above, you will need a few additional items.
A good sealer is a must. Once you have exposed the cambium the tree is as risk of disease but not only that, if the cambium is allowed to dry out it will die and thus the scions will not fuse with one another. So it is important once the scions are combined to create an airtight and watertight seal between them with sealer.
To bind the trunks together you can use pretty much anything, however depending on your choice some further consideration might be required. If you use aluminium wire, it will begin to bite into the bark at some stage and unless removed you will be left with horizontal lines running around the trunks which will take some years to disappear. If you use plastic ties such as cable ties the same might happen if left unattended for too long. For a trunk I created like this using Ficus natalensis I used plastic wrap or otherwise known as pallet wrap. There are many benefits to using this material; it can stretch so can accommodate considerable expansion of the trunks but because there are no thin restraints but rather a sheet-like resistance biting in is pretty much impossible. Another great benefit to using plastic wrap with figs is that it increases the level of moisture on the trunk which seems to trigger the plant into producing aerial roots which then snake down into the ground. If allowed to develop these will contribute not only towards the fusing of the trunks but also to its character.
You will need to gently remove the bark from the scions where you wish for them to fuse. To do this you will need a blade or sharp knife. I like using a grafting knife for the purpose.
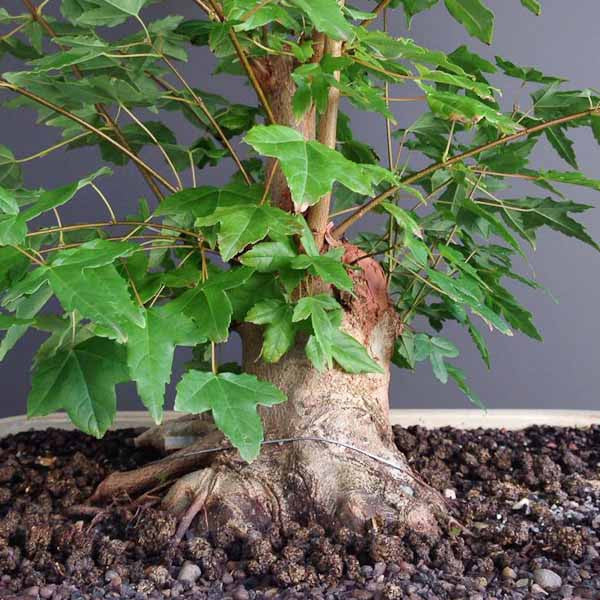
Image caption. The fused trunk potted into a container.
Once you have everything prepared its a pretty quick operation to finish the exercise. With plant species which fuse very easily, which the acer is, simply binding the trunks together so they cannot move will result in them fusing. With figs the same applies. However with some species, or those with coarse bark and which do not do this as readily you need to remove the bark to expose the cambium. Removing the bark of any species, providing you can line all the scions up with the exposed cambium of the other scions will simply result in fusing taking place faster.
Work quickly once the scions and their root systems are exposed, bind them together and then plant into suitable growing medium. Seal the exposed areas to ensure they are not exposed to air or water.
Water thoroughly and then place in morning sun, in a sheltered spot which receives little wind.
A year later or even sooner all the trunks should be fused. You can then remove the restraints and allow the tree to develop without pruning any of the branches. The longer they become the more the trunk has to expand in order to increase the amount of pathways in which sap can move through and up into the tree. As the trunk expands the individual trunks will slowly become less and less visible until it appears as one.
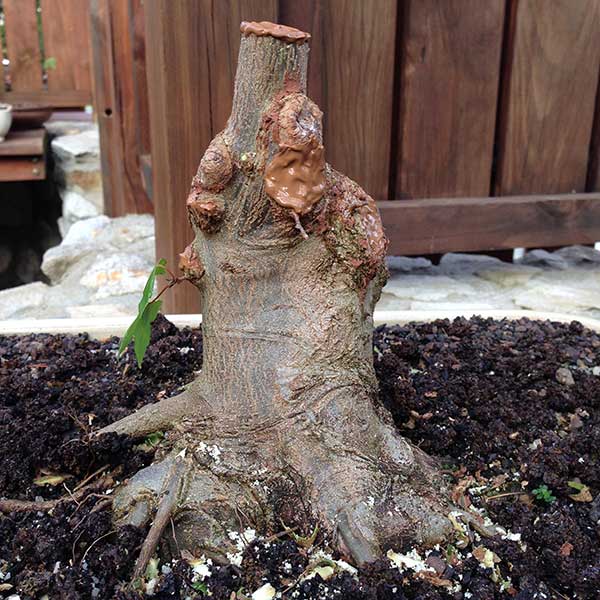
Image caption. The tree as at year end 2014, sacrificial branches removed.
After a season or two you can lift the planting from the ground if you were developing it in the ground, or you could put it into a smaller container. However do not do this until the trunk is properly fused and thick enough for your purposes. Once you begin to reduce the container size you dramatically reduce the speed at which the tree will develop as well.
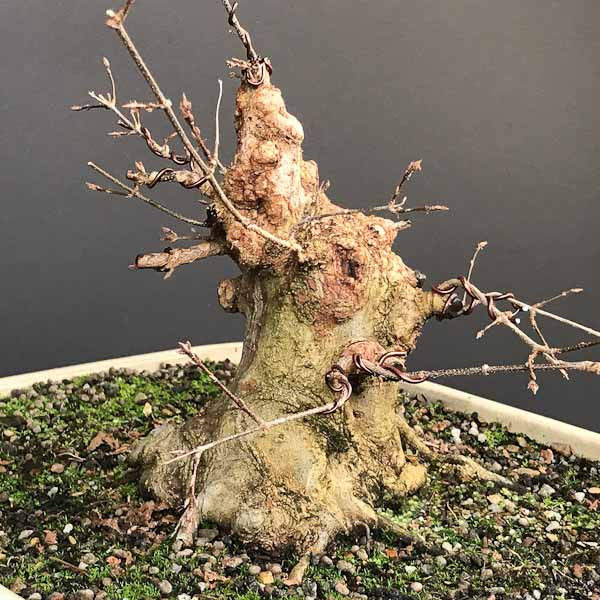
Image caption. Early spring 2017. Now 7 years later. The trunk and nebari is a massive 14cm across, and only 20cm in height.
The individual trunks are now completely invisible. The trunk is dramatic and powerful. There are other methods which can be employed to achieve thick, tapering trunks but in my opinion this is the fastest method I have used. {In this statement I do not consider air-layering. Using air-layering is of course the fastest method of all and in fact the technique of choice for high quality shohin sized trees}
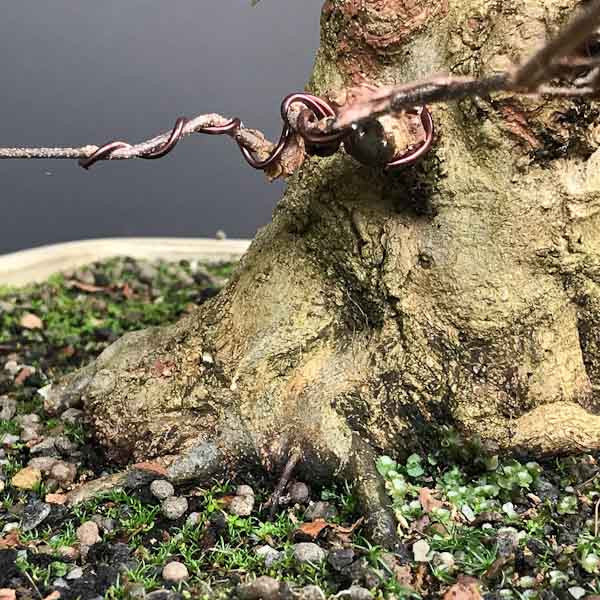
Image caption. Flaring trunk
If, while you were developing the tree in the ground or over-sized container you paid attention to the nebari or roots you will be rewarded with very pleasing trunk flare and nebari spreading out in all directions. You can of course improve this further by performing root grafts. Read this popular post on field growing for more tips on growing trees in the ground.
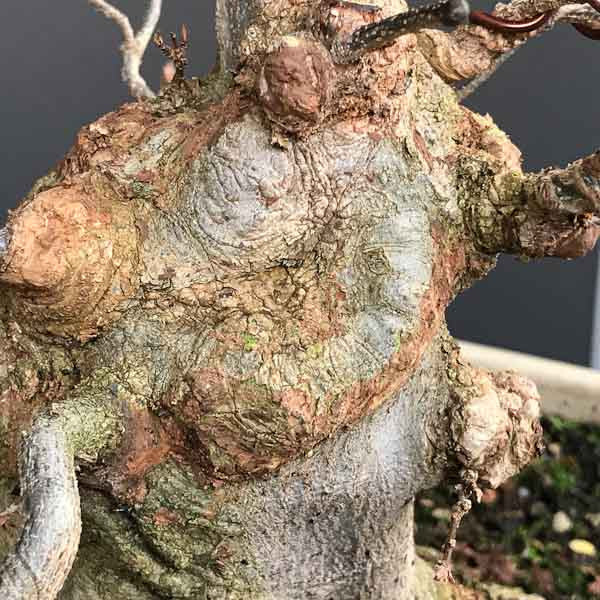
Image caption. Healed scar which was once a trunk.
As mentioned above, there are other methods to develop trunks but unlike field growing a single trunk which ultimately must be chopped down and will leave a single large scar, this method will leave smaller scars - equivalent to the number of scions or trunks you combined in the beginning. These smaller scars heal over much quicker.
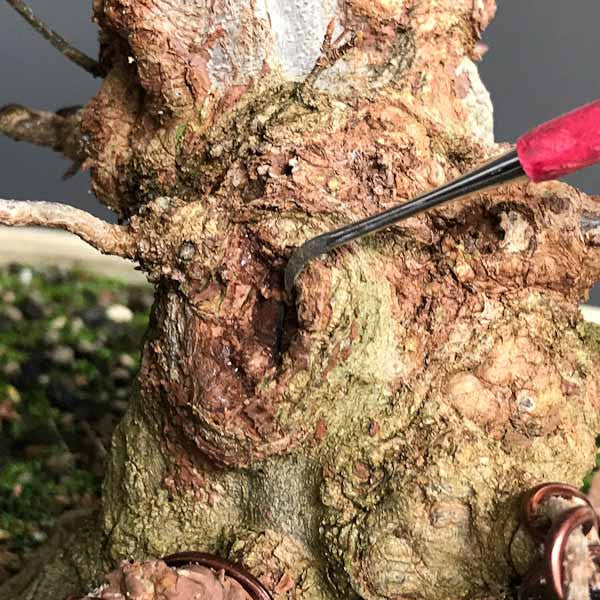
Image caption. Cleaning out old scars with a Kikuwa jin tool.
You can even speed up the healing process by "re-activating" the callous by removing the bark around the edges of the wound, exposing the green cambium below and then sealing it.
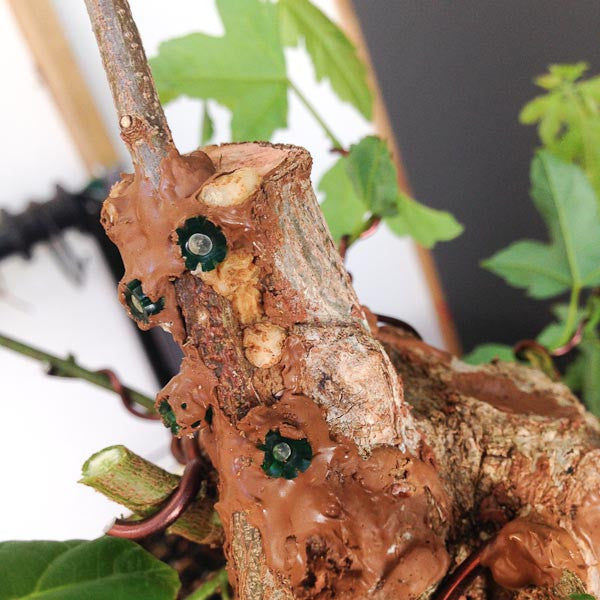
Image caption. Replacing the trunkline
When trees develop very quickly their internodal distances are large. This is often acceptible on larger trees but not in small, shohin sized bonsai. No buds develop in this space so if you need one you need to either wish for one (ha ha) or graft one in. In the image above I grafted another Trident maple, growing in its own container, to the main trunk of this tree. The reason for this was as there were no buds on the main trunk after I had reduced its height so I needed one there or it would die back to where a bud did exist. However a fairly large scar would also remain. By successfully grafting into that area I will be able to speed up the callousing process considerably.
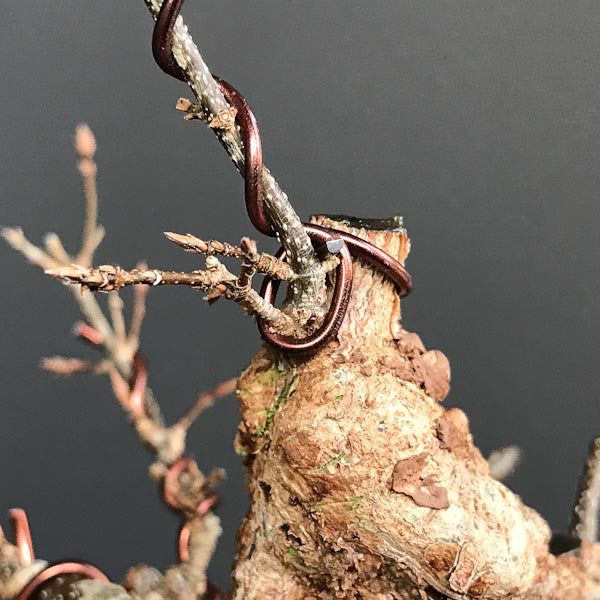
Image caption. The resulting graft.
You can see in the image above how successful this technique was. I now have several buds to choose from, and when I do reduce the stub of the old trunk there will be a good amount of sapflow which will aid in its healing.
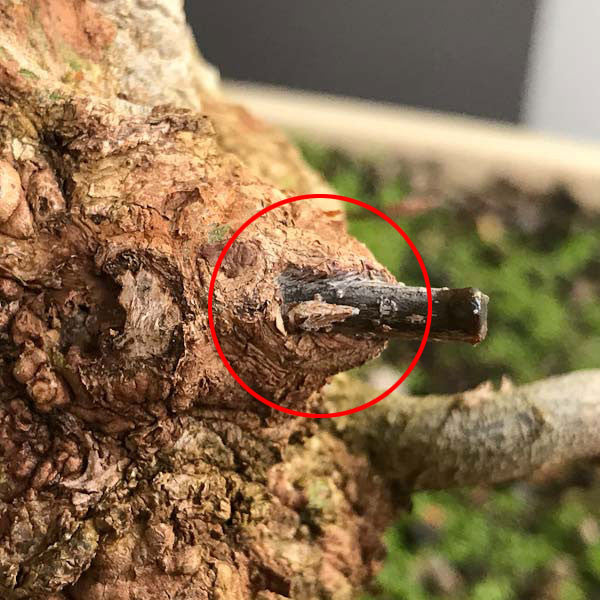
Image caption. Position of a bud
A very good tip which I would like to share with you is that when you do a thread or approach graft, you should consider using scion material with short internodes. Then once you position the scion in the grafting location be sure you have buds where you would like them to be in the future. As indicated by the red circle above, you can see I have positioned a bud close to the trunk which I can now develop into the new branch.
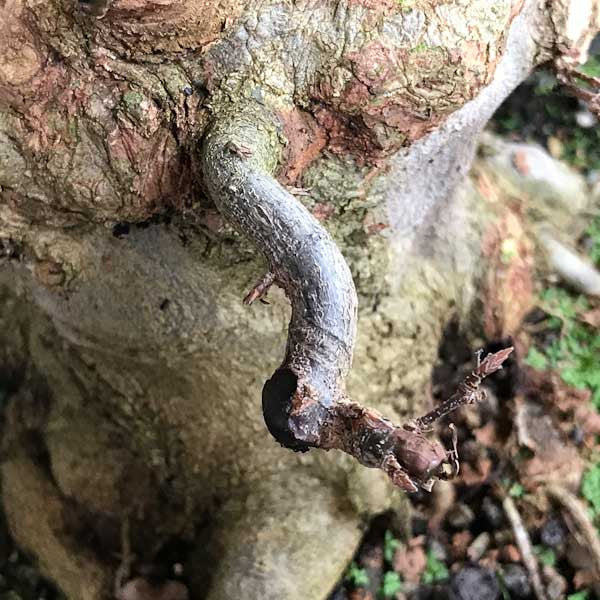
Image caption. Give branches shape while they are still flexible
Trident maple branches have the rather frustrating habit of snapping when bent, when they are a little older. Be sure to put some shape into young branches while you still can, once they are 2 or 3 years old the risk of snapping increases exponentially.
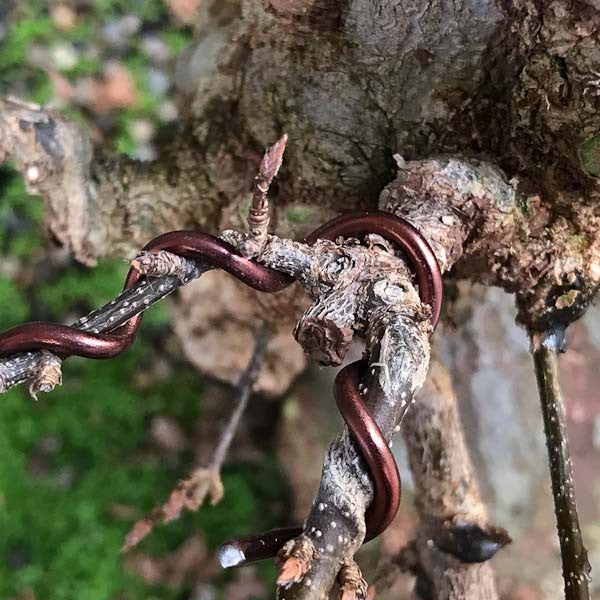
Image caption. Branches in the fork
Buds on Trident maples are opposite. Generally, developing branch structure on this species entails removing the center branch and using the side branches. When I initially make this cut, to remove the center branch, I allow some of it to remain. This allows the sap to recede and develop new lines of flow into the side branches without risking the sap receding beyond these side branches and you losing those as well. Furthermore it reduces of the risk of these side branches from breaking if you wire them at the same time as removing the center branch. Once the remaining stub has dried up and its purpose served you can remove it with a narrow branch cutter or other suitable tool.
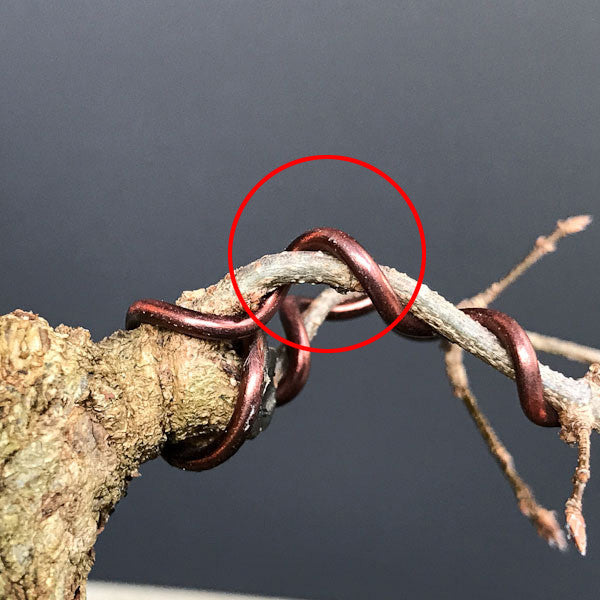
Image caption. Wiring on the outside of the bend
My last tip for this post is that when you wire you should have some idea of where you will be putting the bends into the branches and wire so that the wire will be on the outside of these bends. This will greatly reduce the risk of snapping. In my experience this has made a big difference, but don't take my word for it alone - test it and see for yourself.
This novel approach is useful to know because:
Well that's it for this post, hope you enjoyed it and the greatest compliment you can pay me is if you go out and try this yourself. I guess if you are an absolute beginner it might sound terribly complicated but it really isn't. Besides, if you give it a go with some cheap material you have nothing to lose but everything to gain.
August 29, 2017
Hi
To ensure nice Autumn colors for both the Trident as well as the Japanese maples, what do I have to do and at what stage of the season?
And also thanks; those 21cm pots I have received are good value for money
Groetnis, Gideon
August 07, 2017
Thanks for reading Les, I am sure you can teach me a thing or two as well! Thats a long time growing Tridents. I love them as I am sure you do also.
August 07, 2017
Very good article. I have been growing Tridents for over 25 yrs, but have never tried this technique. I will now!
Thanks,
Les
Comments will be approved before showing up.

Exclusive Offer: Buy 2 Venus Fly Traps, Get the 3rd One FREE - Limited Time Only!
Add three, six, nine or any other multiple of three of our hungry fly traps to your cart and the discount is automatically applied.
Terry Erasmus
August 29, 2017
Good question Gideon. To be honest I am not sure you can do all that much to increase the colour. Temperature is the main factor to my knowledge – colder the better and the characteristic of the tree/s you have as genetics have a lot to do with this too. I have many maples and all are treated the same yet some have much better colour than the others, so the only difference here is genetic; the answer: buy trees with good colour to begin with.