Your Cart is Empty


Initial styling of a Japanese Black Pine
In this blog post I would like to write about the initial or first styling of a Japanese Black Pine. I purchased and imported this pine at the end of 2103 from the Saitama prefecture in Japan. I still remember clearly walking around and spotting it. Although it was completely rough and looked pretty nasty I recognized the potential immediately and already began to think about how I would restyle it.
I imported the tree and as I do with most trees I keep for myself, and those I sell to customers, I don't do anything major with them for a while. Typically a season. However as Japanese Black Pines naturally grow on the coastlines of Japan, the climate where I live is ideally suited to them so they adapt very quickly.
It was for this reason that at the end of 2014 I removed a lot of the branches and foliage. In my mind I had a pretty clear picture of what the tree would look like and therefore it was easy to eliminate the branches which did not fit in as they were not needed, were too close to other branches and such. With pines one needs to work with confidence as you are not quickly, if ever going to get a branch to grow back if you remove it. (Grafting is one way in which you can do this of course.)
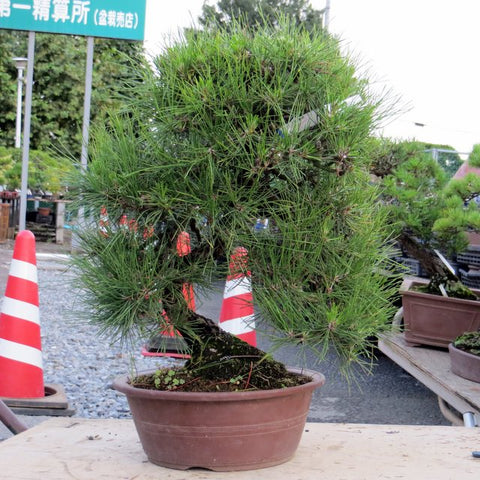
Image caption. The pine at the nursery I purchased it at in Japan. Before any work began on it.
Anyway, as I was saying, I removed a lot of material in December of 2014, fed it well with BonsaiBoost and allowed the tree to rest. I did no wiring at that time. The result was that the tree pushed out new and fairly strong candles this spring and I also had some back budding.
Fast forwarding to the present time, I decided to decandle it and wire it at the same time. As I did not repot it, this was possible. If I had repotted it this season I would be very reluctant to decandle and wire it as this would have weakened the tree a lot, even more than the repotting alone would have done. So let me use a couple pics to show you some aspects of pine work. I am sorry that I did not take step by step pics but I got a little too enthusiastic when I got into the styling so I sort of forgot!

Image caption. In preparation for the work to come I fed the tree very well using BonsaiBoost.
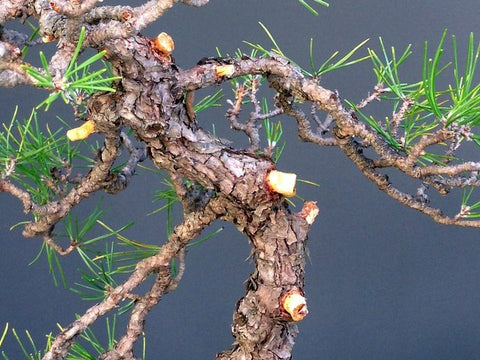
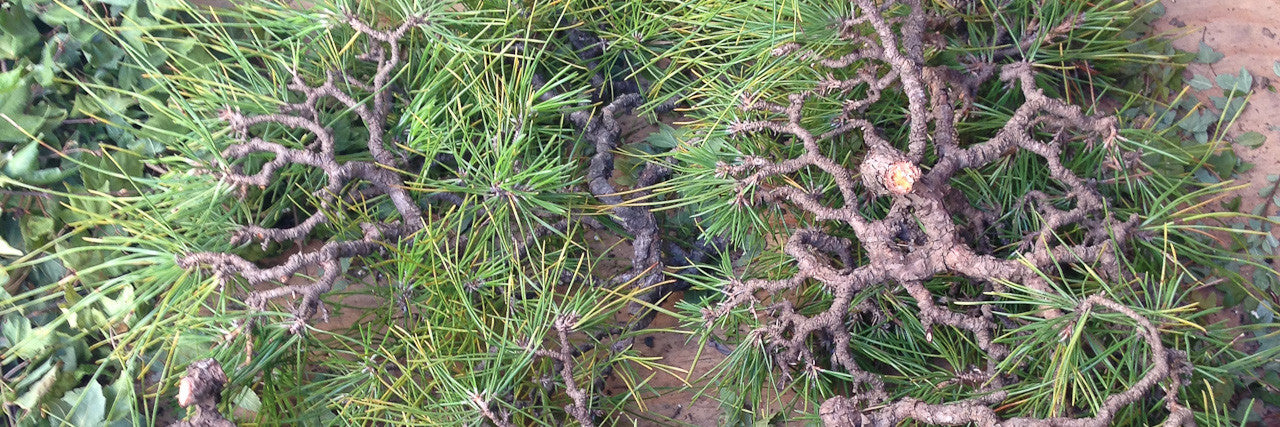
Image caption. I use a branch cutter to sever the bark at the trunk and then use a pliers to squash and remove the bark. These stubs may be useful to anchor guy wires when styling. No sealer is needed and eventually you can carve or shape them as you see fit.
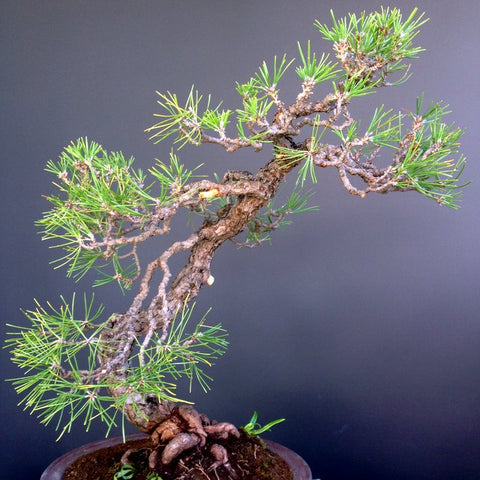
Image caption. This is what I was left with after removing the branches. I also removed the moss growing on the roots and trunk using a nylon brush. Moss is a sure destroyer of the bark, as it causes it to rot and fall off.
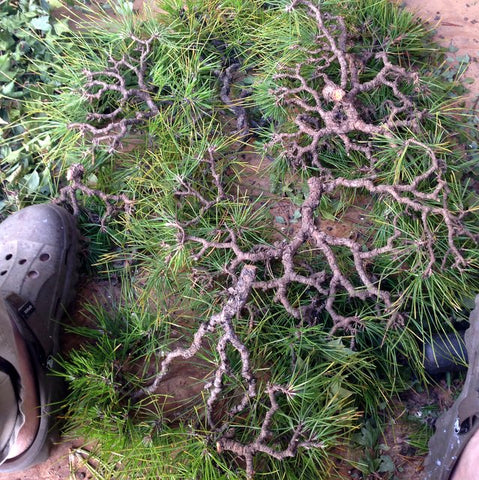
Image caption. Shame, all that wiring work that the previous artist must have done, all cut off and laying on my floor.
The tree was allowed to rest after the above work and I kept up with the BonsaiBoostfeeding program.
In November of 2015, so roughly a year from when the above work was done I decandled (a subject to be dealt with in a future post)the tree and then styled it.

Image caption. I am sure you are all familiar with the concept of choosing a front. If not please be sure to purchase my E-Book which covers these basics and much more. Select your front and mark it so that when you are styling the tree you keep turning the tree back to view it from the same front each time.
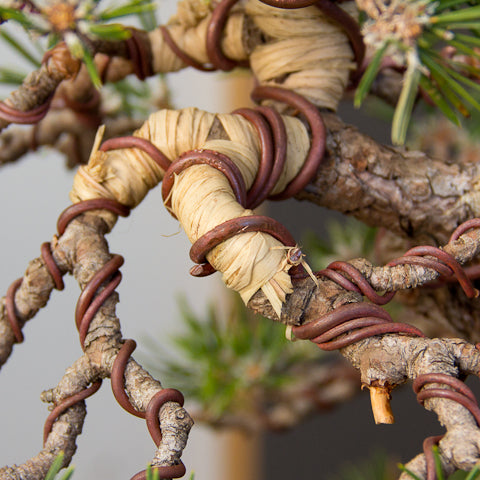
Image caption. As I needed to do a fairly large bend on these branches I needed to wrap it in raffia.
When making larger bends in conifers you need to ensure that the live tissue does not separate from the wood beneath. In order to achieve this you need to use something to securely wrap around the trunk or branch to prevent the separation. Raffia is the traditional method. Soak the raffia for a bit in water and then select a few strands, tying them at the end. Leave a little of the raffia protruding when you begin wrapping so that you have something to tie the end off with. Wrap tightly around the area to be bent and then tie securely. Wire as normal. Be sure to support the outside of bends and I use a pliers to bend the wire which in turn bends the branch.
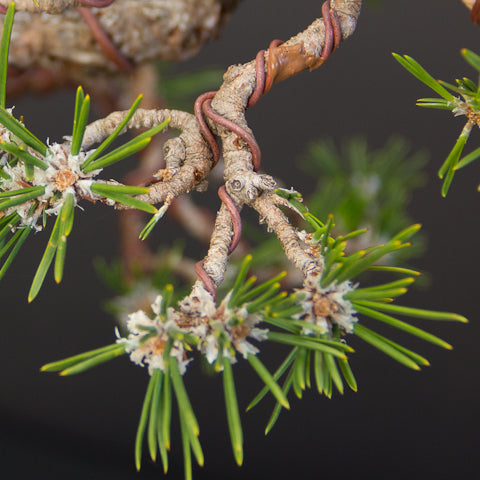
Image caption. Not every branch needs to be wired.
Good wiring takes lots of practice to do effectively. Work towards using as little wire as possible to achieve your goal. Here we are using copper wire as it is far stronger than aluminium. As you can see the branch in the center of the image has been wired but only one of the two forks has wire on it. This is as you can twist the branch to bring the other fork up or down as you need. It is not necessary to wire that one also.
I also use my Kaneshin pliers a lot when applying thicker or stiffer wire as well as when I bend the wired branch. Instead of holding the branch and bending it, I simply grip the wire and bend the wire. This enables me to spread the pressure more along the branch and also to make more compact bends, and to do so in a more controlled fashion.
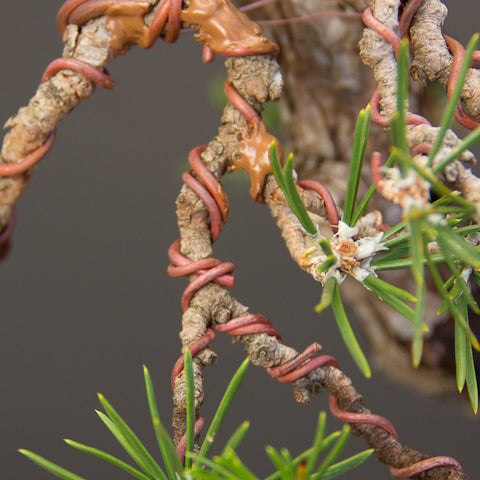
Image caption. Anchoring wire is important
Many times a thicker wire is needed to wire a portion of a branch but this wire becomes too thick for the remainder. So when you add another wire, be sure to anchor the first one to the branch, as above just before the fork, or it may move away from the branch when you apply a bend to it.
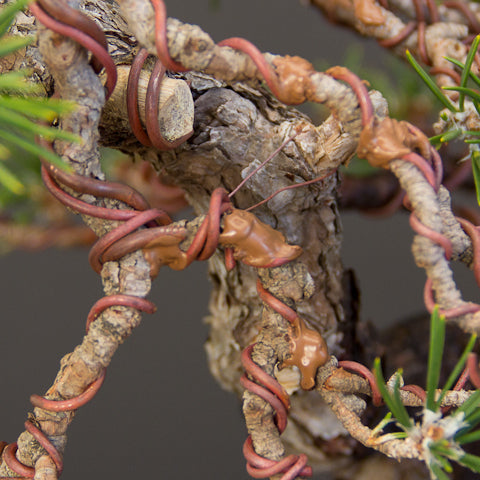
Image caption. Guy wires and breaks
Us a guy wire to bring branches and trunks together. It is a far less stressful method as the bend takes place over a greater length of living tissue instead of only in a localised section. If you do however need to make a compact bend/curve then you will need to do so with wire. Use old branch stubs or even a screw, screwed into the branch to anchor the wire onto. Use a pliers to slowly close the gap by twisting the wire.
If you crack a branch at some stage, be sure to immediately seal it. Use a good sealer for conifers like the Japanese cut paste as this will ensure an airtight seal beneath which healing can take place rapidly due to the hormones added to this particular paste.
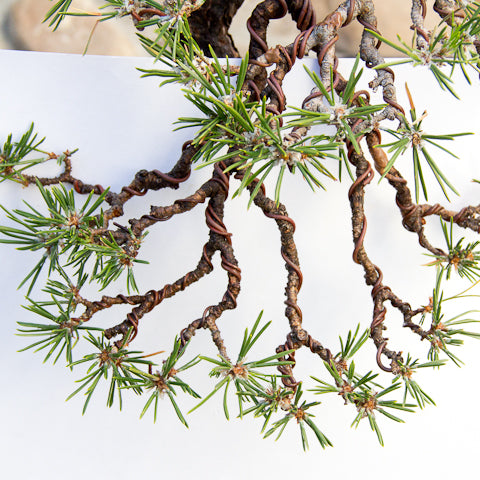
Image caption. Do not create branches which resemble a fish skeleton. Instead they should resemble something more like this.
One of the most common mistakes I see on trees locally is that branches are created from a central branch which has dozens of smaller branches shooting out to the sides. This is not how branch pads should be created on deciduous or evergreen trees.
There should be a main branch stemming from the trunk which should fork into two and these into another two and so on. This creates space in which you can create a foliage pad with volume and one which has a future and will not dieback due to insufficient sapflow. Each terminal on a pine must get its equal share of sunlight or it will be shaded and will weaken. When viewed from the top the pad should be rounded without branches protruding from the outline.
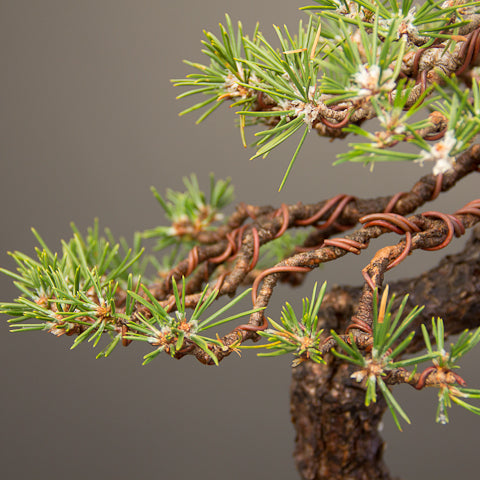
Image caption. Branch pads from the front
From the front, all the branches which make up the bottom of a pad should be on the same level. As this is a first styling I am aware that the pads need to fill out in the future. How this is achieved on black pines is that when the branches are decandled buds will form along the branches and these can be developed into branches which will be overlayed onto this base to create volume in the pads.
Another important aspect of the branch positioning in the lower parts of the tree is that the branches must all descend. This creates the illusion of age, telling a story of how the branches have drooped after many years. As you move up to the apical area of the tree the branches move to a more vertical position.
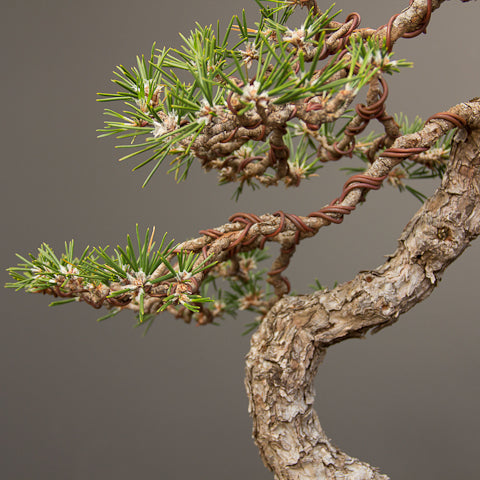
Image caption. Play with positive and negative spaces
Here the branch kind of follows the trunkline and creates an interesting tension between the two. I like this very much as it adds interest. Use this principle of positive and negative space to create interest in your styling of trees.
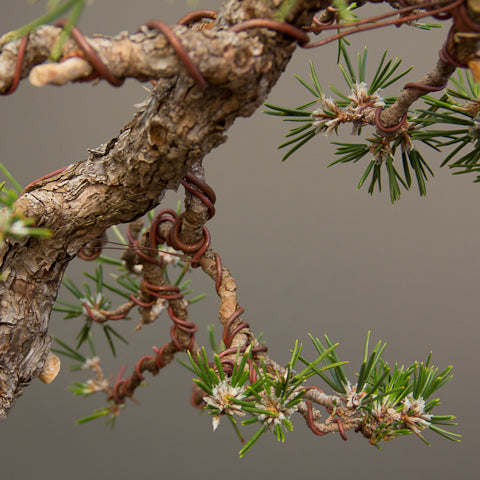
Image caption. Back branches give the tree depth
We cannot go into detail about branches and movement in this post, but one of the branches which I find lacking in some trees is the back branch. A bonsai tree is not a 2D artwork it is a 3D artwork so it must have depth. Don't forget to create depth in your tree with this very important branch. Some people focus only on the left and right branches but give little effort to developing front and back branches. In fact, when viewed from the top a good bonsai tree will have very balanced branching in all directions. If you would like to know more about these basic concepts then please take a look at my 80page E-Book which covers this and much more.
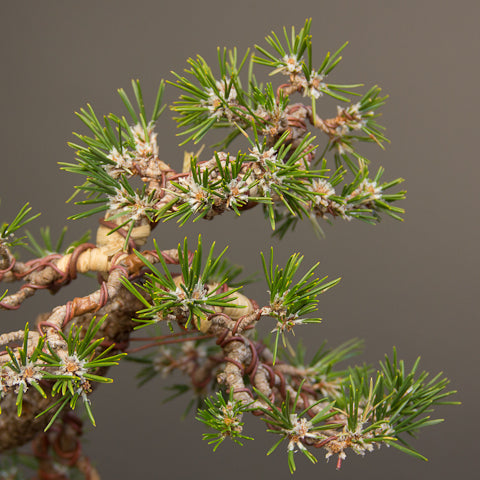
Image caption. The apex, a problem area for some
The apex of a tree is another area some people grapple with. They are not really sure what to do in this upper area of the tree. Essentially you need to round off the top. Bear in mind that the branches in this zone will be more vertical as they grow towards the sunlight. So the goal for the apex should be:
- to once again have each branch tip getting its share of sunlight
- finish the profile of the tree, and in a pine it is usually going to be a fairly rounded outline, not sharp.
- it will be the densest area of the tree as it gets the most sunlight. Lower branches will be slightly more sparse to suggest this feeling of a large tree in nature where the sun has to travel all the way down to the bottom of the tree and by the time it gets there its weaker. The growth should reflect that.
- as this portion of the tree will naturally be stronger than the lower regions when you do bud selection you need to select and retain the weaker shoots, eliminating the stronger ones. This is of course opposite to what you will do in the lower regions.
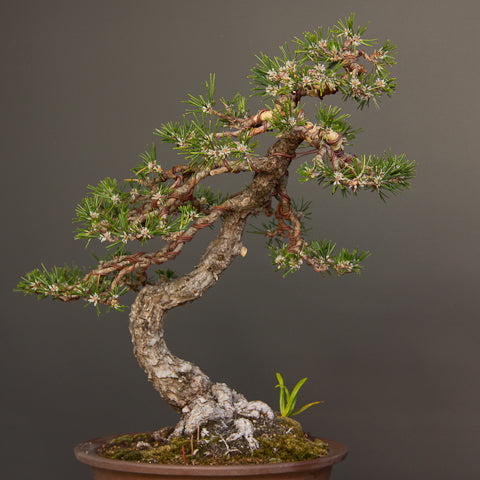
Image caption. Front option 1.
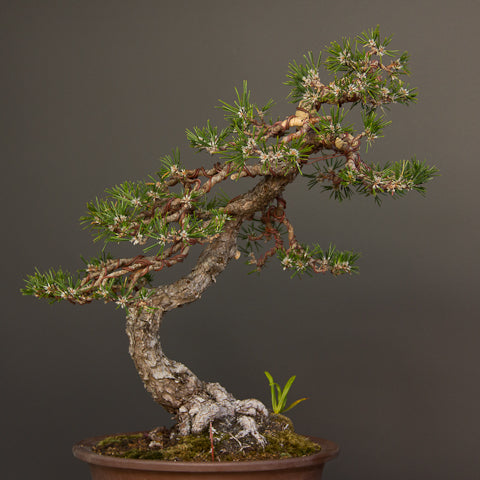
Image caption. Front option 2
You will notice that by changing the angle of rotation only slightly it makes quite a change to the view of the tree. Take a look at the negative spaces created by the branches to the trunk. The movement to right is slightly more dramatic with option 2 also. Never be afraid to play with your trees, tilting them, revolving them etc. As your tree is continually changing as the seasons go by, there is a good chance the front you chose 5 years ago is no longer the best one.
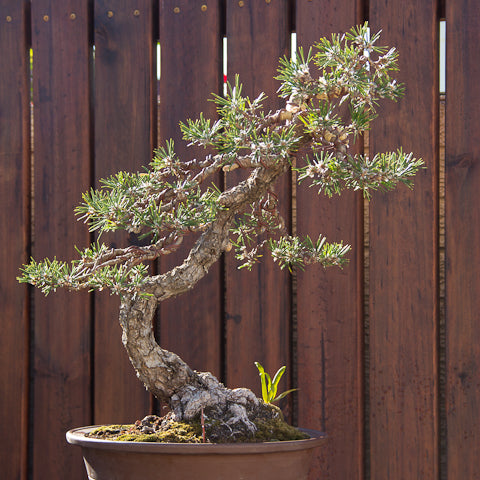
Image caption. This styling is completed for now. Quite a dramatic change from the first image I am sure you will agree. Notice the overall roughly triangular outline of the tree.
I have placed the tree outside in the sun and will now allow it to recover. I'll give it a week or two and will then start feeding it again. The goal now will be to create some more volume to the pads however with bunjingi or literati trees one needs to be careful of losing the minimalistic, baren, beaten sort of look by making the tree appear too healthy by allowing the foliage pads to get too dense. However we would like to maintain a delicate branch structure and fill in some of the gaps so I will achieve that by keeping the tree healthy, decandling and needle plucking.
The wire can remain on the tree until it begins biting in quite a bit. There is no need to remove it before then. I found the branches on this tree to be rather brittle, which could just be a characteristic of this particular black pine or they might be rather old already. The extremely flaky bark which fell off when I wired it will eventually return once the wire is removed and the branches are not disturbed. This is another reason why using guy wires can be so useful especially on old branches and trunks when you dont wish to disturb the bark. Simply insert a screw to anchor the guy wire on both sides and tighten, no need to apply any wire wrapping at all. For thick branches and trunks I would strongly suggest the use of a branch jack as it enables you to make this bend slowly and in a very controlled manner.
Assuming the tree recovers nicely during this season I will repot it next spring. Perhaps you can help me select a new pot when the time comes.
Thanks for reading and please leave your comments below should you need me to clarify anything.
4 Responses


Leave a comment
Comments will be approved before showing up.

Terry
November 26, 2015
Willem, that’s a good question. I will need to see how the tree responds to the treatment. If the tree responds well then I could needle pluck yes. Under normal circumstances this is what you would do. If it responds weakly then I might only reduce the number of old needles a bit.